FAQ
Frequently asked questions - you can browse the topics below to find what you are looking for.


If you are located in EUROPE and want to order without VAT, you will need to provide us with valid VAT number.
HiAmp is shorter and better sealed against dust or water. However, the bearings are still exposed and need a general maintenance.
In most ESC configurations you see an option S-BEC which means that the ESC has 5V or 6V on the PWM cable that goes from the speed controller. With this option you don't need to power your receiver with an additional power supply.
You also have an option called HV-BEC which has a variable voltage (5-8V) that can be changed in the settings of the ESC.
In case you don't need BEC at all, we are offering an OPTO version. This version is for someone who is using for example an external BEC or doesn´t need to power the receiver. In the case of the OPTO version, you need to power the optocoupler in the ESC with 5V on the PWM cable.
If you have BEC in your ESC and you are using an external BEC, it is necessary to disconnect the red cable from the PWM cable from the socket pin.
If you don’t do the procedure you might not have an exact position in a neutral position and also you will not have the full potential of your ESC. Thanks to that procedure the ESC will remember the end points of the transmitter and those limitations will be used as a maximal request for the motor.
Some types of transmitters (Futaba) sometimes have switched ends of limits and our ESCs aren’t able to accept that. You can solve it by switching the signal to reverse. After this change, the ESC should be able to accept that signal.
The name of each ESC is composed of current and voltage. For example, our TMM 40063-3 is for 400A in continuous and for maximal voltage of 63V which represents 15 fully charged Li-po cells.
The right chosen speed controller is the alpha and omega of the whole model. If you want to run with the maximal potential of your motor then it is necessary to have correctly chosen ESC with a motor. Also, it depends on the application if you plan to use your ESC just for bashing it is good to have some reserve in current.
Some ESC recommendations for bashing:
1/5 scale cars: TMM 25063 or TMM 40063 with LMT 30 Series motor. Depends on how much space you have in your model.
1/8 scale cars: TMM 25063, TMM 25035 or TMM 28026 with LMT 22 Series
- Download the Controller 2 application here:
- Connect USBCOM5 to your computer and start the installation process.
- Run the application and check initialization of USBCOM5. Wait for 1 green and 2 orange lights. (semafor)
- Connect the ESC to your USBCOM5, then batteries and turn on the ON/OFF switch. (Configuration without switch - just connect to batteries). Wait for 3 green lights.
1.1 Install the Controller2 PC application from the MGM CONTROLLERS website and proceed with the installation. If you have application Controller2 already installed go straight to point 2.
https://www.mgm-controllers.com/downloads.html
1.2When the application is waiting on connecting USBCOM5, connect only USBCOM5 without connection the ESC.
1.3 Wait until Controller2 is ready after the successful installation.
2.1 Start Controller2 application. If you have already set P4 go straight to point 3.
2.2 Connect USBCOM5 top PC and connect CC_11 connection to USBCOM5 and your controller.
2.3 Check if your USBCOM5 module is active. You need to see green and yellow LED lights at the left top corner of the app.
3.1 Connect the ESC through the antispark solution to your battery pack.
3.2 Turn the Controller ON (in case your configuration includes the main switch, if not ESC will be automatically turned on after the connection of your battery/point 2.4).
3.3 Check the LED identification on the top side of the ESC, you should see the blue led lighting.
3.4 Open settings at the top menu then advance settings and set parameter P4 to "PWM pulse - programmed" after that do not forget to save settings by "Write settings" button
3.5 Turn off your ESC and disconnect that from CC_11.
3.6 Connect your controller to receiver and motor.
3.7 Turn your transmitter (radio) ON.
3.8 Hold full throttle forward. While you are holding the full-throttle, turn on your controller and you will immediately hear 3 beeps, wait for 10sec for another 3 beeps.
3.9 Then hold full throttle backwards and wait for 2 beeps.
3.10 Return to the neutral position and wait for the melody.
3.11 After the melody ends, turn off the controller. The programming procedure was successfully saved to the ESC and you are ready to go.
- Connect the ESC to your PC after the test run of your model vehicle.
- Run the Controller2 PC application. Connect the battery and turn ON the controller.
- Click on the "History".
- The next step is to click on "Read History".
- After that save the history to XLS and HDF data file.
At first make sure that parameter P71: BB is set to 'OFF – monitoring enabled' To access the ESC settings you need to do the following:
- connect the USBCOM5 to PC and to the controller.
- now turn the controller ON and it should access the settings. Set the parameter P71.
- save the settings, then unplug the USB from PC.
Turn ON the controller without a connected USBCOM5 module. The controller plays the “sound notification” And then it is time to connect the USBCOM5 to PC and to the controller. Enter the monitoring tab in the application. Then press start and wait for initialization.
Please note that the real-time monitoring is only supported by X2-series PRO controllers and HBC-series controllers!
There are a few reasons why you might see a cancelled order in your Order History. Your payment was declined, the billing address does not match the one on file with your credit card company, or other authorization issues. Check your email for a follow-up message from our support team or use the chat to reach us.
- In case that you ordered ESC with connectors on the battery side, you have in your package the counterparts for soldering to your batteries. In case that you didn't order connectors, please, solder your own connectors to the ESC.
- If you want to get to the ESC settings you need to install our program Controller 2. During the installation is necessary to allow downloading of all drivers and it is necessary to have connected your USBCOM. Without connected USBCOM you are not able to install this program.
- After successful installation, you can turn ON the application, connect USBCOM with your computer and your ESC and after that you can turn on (connect to batteries) your ESC.
- Set transmitter throttle limits - (Tutorial down below)
We always recommend doing some test runs before a full run. From these tests, you can check the behavior of the ESC which you can change later. But the most important are measured values. Please, make sure that your setup is chosen properly for your ESC. If you are not sure about the measured values you can share the .hdf and .xls file with our team which will help you to analyze them.
It mostly depends on your RC model type. The differences between the best settings for each are different. A few of the most useful parameters are:
P16 Acceleration
P21 Freewheel
P22 Brake intensity
P52 Motor timing
P42 Cut off voltage per cell
Yes, in this case we can solder DELTA STRAPS to your motor for you. It will allow you to connect the motor 30 Series to controllers with 3 motor outputs.
It is recommended when you want to use very long battery power cables (between the battery and the ESC), or you use high voltage at the edge of controllers’ capabilities, or for racing purposes (high load).
The additional capacitors in the capacitors block have to be the exact same type as the ESC’s filtering capacitors and the block must have at least twice the capacity or greater.External capacitors pack is an option in each MGM ESC configuration and can also be bought seperataleny at our website.
- To access the ESC settings you need to do the following:
- connect the USBCOM5 to PC and to the controller.
- now turn the controller ON and it should access the settings. Set the parameter P71.
- save the settings, then unplug the USB from PC.
3) The controller plays the “sound notification”
4) And then it is time to connect the USBCOM5 to PC and to the controller.
5) Enter the monitoring tab in the application.
6) Then press start and wait for initialization. The monitoring should be working now.
Note: It is not available when P3: Model type is set to Heli modes!
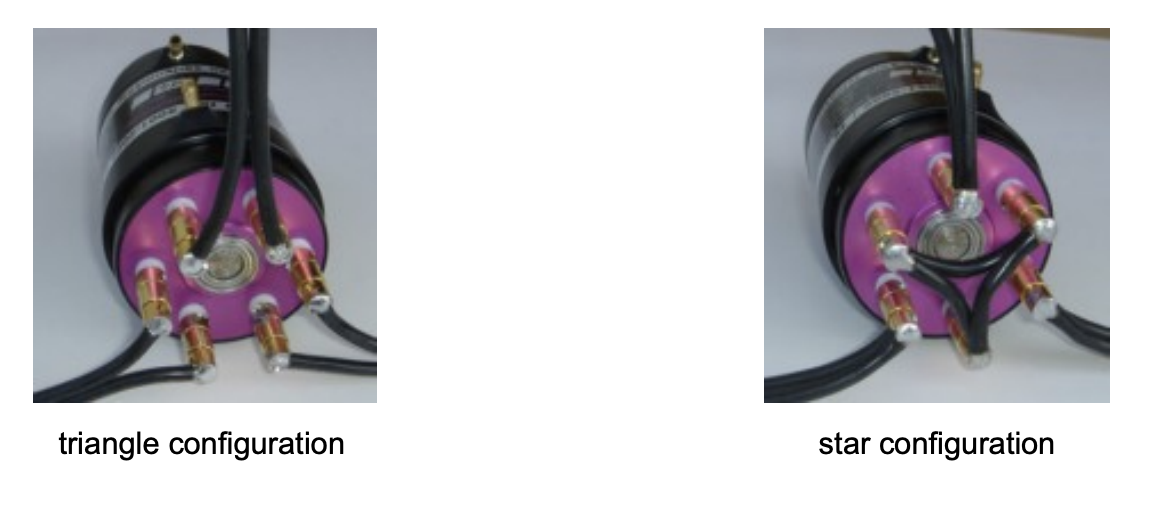
Series 30xx motors can be used in a triangle configuration or in a star configuration. The 6 high current connectors of the motor can be used in two different ways (see pictures below). In a star configuration, the motor behaves as if it has 1.73 times the number of windings and an accordingly, by the same factor, lower rpm per volt. Example: In triangle configuration a 3060 / 8 has 875 rpm per volt, in star configuration the same motor has 506 rpm per volt.
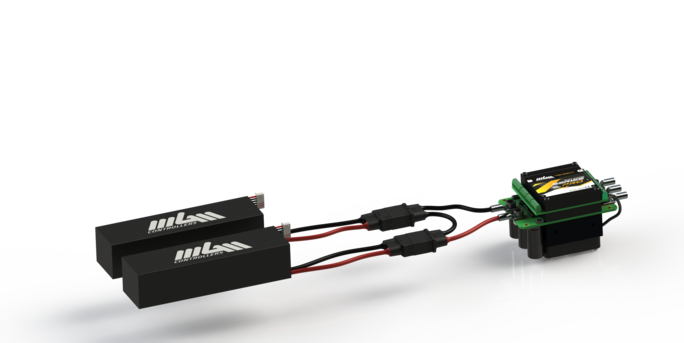
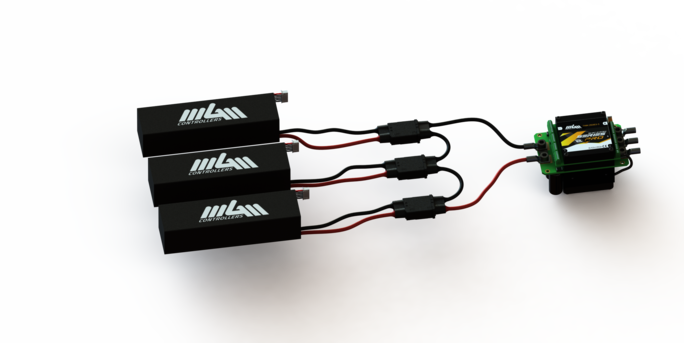
If you have 2 packs of batteries up to 7s you need to connect them together in series to get 14s (one plus pole(red) of the first battery to one minus pole(black) of a second battery). Then there will remain one minus pole on the first battery and one plus pole on the second battery unconnected.
You will connect these two wires to the controller’s power wires. (If you have 1.8mm antispark you need to connect this thin red antispark wire at first) Then you will connect black minus wires together and red plus wires together. This can be dangerous if you will not do it right.
Please see our manual about “How to correctly use the antispark” or ask your friends for help, if they have experience with this matter.
Peak current is exactly measured maximal values by ESC, this current can exceed limits which are recommended but just for a few milliseconds.
The continuous current is the average current from the peak current. This current is oriental and important for checking in longer using.
Overheated – the controller starts limiting the power gradually until the temperature is lowered. The internal temperature limit of the controller is 100°C. The motor temperature limit is standardly set to 90°C, but it can be changed.
Overcurrent – there are 2 possible situations:
- If the current flow is bigger than the nominal current of the controller, but also lower than “2.8 times of the nominal current”, the controller starts to limit the power gradually. When it is necessary to drop the power to 0%, then it is also required to move the throttle to zero position. Only then the controller will be unblocked.
- If the current flow is higher than 2.8 times the nominal current, then the controller is immediately shut down. The controller can be unblocked only at the moment when the throttle is set to zero by the user.
If you get Green, Yellow and Grey then this indication means that the application is waiting for the connection of your ESC. After you connect the ESC, you should see all 3 LEDs green. If that case doesn't happen you can try to check pins on the ESC and on the USBCOM if they are not bent.
Also, sometimes can help disconnection and connection of CC_11 because sometimes it can happen that the pin isn't fully connected.
If you want to measure your speed during the run it is necessary to know the exact gear ratio and wheel diameter. If you write the exact gear ratio and wheel diameter to your ESC then the speed controller will calculate motor RPMs and after reading the history you will see speed instead of RPMs.
Yes, you can. But we do not recommend using a mechanical brake because the braking efficiency of the motor might not be enough. If you decide to use the mechanical brake, it is necessary to set a few parameters.
P.2 Direction mode - one-way
P.21 Freewheel YES (NO synchro)
P.7 Throttle - neutral should be same as P8 Throttle - max backward/brake
During the installation please accept the downloading of all drivers. If you were stopped during the installation you probably don't have a USBCOM connected to your computer. If your installation was stopped, make sure that you have a stable connection to your internet.
Antispark is only used to prevent sparks when connecting the batteries. Mostly, we recommend using QS8 or XT90 connectors that have built-in antispark. It is more comfortable than using the connection of a small antispark cable. In case that you have this antispark cable, use it only for precharging the ESC for preventing sparks. Please, do not use this cable for powering external BEC or anything else.


